Monthly Archives: March 2015

Revolutionary Full Color Chocolate 3D Printing Eggbotsz on Kickstarter

With its new Kickstarter Eggbotsz hopes to fund the, ChocoRockoBotto its unique full color chocolate 3D printing technology. The technology developed at Carnegie Mellon University’s Robotics Institute by Professor Willow Yank, hopes to revolutionize the culinary arts. Chocolate 3D printers have been around for a number of years now and are making inroads into high end restaurants and chocolatiers, revolutionizing both chocolate and cooking. Is the full color chocolate Eggbot the device that will bring 3D printing to your kitchen? Two early beta testers have already done head spinning work with the first chocolate 3D printers. Their work indicates that the 3D printing revolution is moving into the kitchen and may change everything.

Paul Chichikov of Chocolatier Villages Potemkin

Paul Chichikov of Chocolatier Villages Potemkin hopes to bring 3D printing to pallets worldwide

Brooklyn based artisan organic shade grown single origin chocolate maestro Paul Chichikov of Chocolatier Villages Potemkin for example 3D prints his hand swafted GMO free Easter Ostrich Eggs to the delight of customers from Greenpoint and beyond. Paul, who is a 3D printing evangelist says that in the long weekend that he’s been mastering 3D printing, “it has changed my life. ”

Ostrich Egg

A customer holding one of Paul’s 3D printed Ostrich Eggs at Villages Potemkin

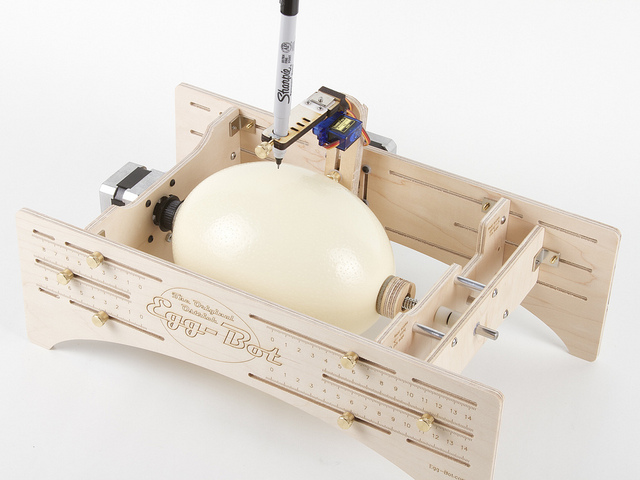
The 3D printed Easter Ostrich Eggs, filled to the brim with Acai berries, bee pollen, wakame & wheat grass cost $190 each and contain 4.8 kilos of the highest quality Kyrgyzstanian Highland chocolate. Paul uses an EggBotsz to 3D print his creations. This Professional Desktop 3D printer is specifically made to 3D print eggs of any type. Until now Chichikov has run into some limitations with 3D printing. “I’ve always said for many years that 3D printing is going to revolutionize the culinary world, but as an urban forager and an artist I felt that 3D printing was holding me back. I want 4D, I want color. I told the Eggbotsz team give me full color and I’ll conquer the world. I believe that the Eggbotsz can make a Croconut-like impact on gastronomy, be something truly revolutionary. ”

The Eggbot

The Eggbotsz putting the finishing touches on one of Ms. Jil Ipoya’s award winning culinary delights.

Japanese chef Jil Ipoya uses an Eggbotsz in her 3 Michelin star Spanish Mexican fusion tapas restaurant Pinche Wey in Manhattan.  Ms. Ipoya says she, “enjoys the wealth of egg textures and shapes…as well as the design freedom she has when designing her own eggs.”  Ms. Ipoya, who is the only Chef to have worked in North America who has not yet been nominated for a James Beard Award, also stated that, “3D printing will play a mayor role in the culinary arts especially in the new wave of post-molecular gastronomy.”  “With atomic gastronomy chef’s creations can become even more contrived & recondite with menus hopefully becoming more akin to deadal worded technical manuals that bring true culinary fission to the table.” Ms. Ipoya, who has experimented with 3D printing scrambled & even poached eggs, uses the technology for 6 courses on her 158 course, Signature Tasting Menu with each course served either intravenously or in a pipette.

One of her most popular dishes, Muff & Min, is entirely 3D printed. The deconstructed Egg McMuffin inspired dish uses an Earl Grey infused essence of Jidori Hen terrine on Bresse egg souffle set in zest of King Crab served on a foam of sous vide sourdough wrapped in dedain and artifice with a side of liquid nitrogen spheres and granular distillate of brine. The dish is served in a shot glass hanging from a small drone to mimic man’s hunter gatherer past. Diners pursue the drone through the restaurant and once they either tire or catch it, down the shot while standing on one leg holding a ping pong paddle as wait staff fire white roses at them from Nerf guns. The New York Times called the dish “a revelation….clearly Ms. Jil Ipoya is breaking new ground in fine dining. Ms. Ipoya is truly one of the hottest chefs in lower Manhattan and her cooking is not bad either.”  To reconnect with nature diners are also encouraged to pick their own eggs, forage for food in the dumpsters of neighboring restaurants  as well as use a compound bow to hunt for deer in Central Park.  Ms. Ipoya was searching for a clearer way to distinguish herself from her peers thinks that 3D Printing her eggs, in color, may be the way to do it.

The Invention of Full Color Chocolate 3D Printing

Across the Redheffer quad at CMU there stands an old dilapidated building used for nuclear frisson testing in the 1950’s and long since abandoned. Professor Yank along with her students Wǒ Kào & Kono Yarou has worked here for 3 years in complete secrecy on full color chocolate 3D printing. The Lamarck House, is a desolate place, with upturned desks, dust covered scientific equipment and ytwokay bugs scurrying back and forth. Here the team had little contact with other CMU students and staff. They worked long hours perfecting their full color 3D printing technique, living on ramen and hope.

CMU's Professor Willow Yank inventor of Full Color Chocolate 3D printing

CMU’s Professor Willow Yank inventor of Full Color Chocolate 3D printing

For one and a half years the team struggled to get their U axis and V axis under control. U and V axis control being one of the most essential elements to high dimensional flavor-ability in 3D printing chocolate. If they couldn’t get the dimensional flavor-ability right the team could not obtain a high Choxels Per Inch. CPI is the key Key Performance Indicator for the chocolate 3D printing industry. According to a recent research report by Ranger, CPI rates in new chocolate 3D printers are accelerating with newer systems having CPIs in the range of 9 to 11. “It was always going to be about CPI for us, Choxels Per Inch is the challenge in our industry and if would be able to develop an ultra high CPI technology, we’d be able to put a chocolate 3D printer on every kitchen-table”, says Professor Yank. The Chocolate 3D Printing Industry is set to grow by 78% to $6.4 billion by Tuesday according to a recent report by research firm Yard.

Graph by boutique investment hose Wing & Prayer illustrating the explosive growth in chocolate 3D printing

Graph by boutique investment house Wing & Prayer illustrating the explosive growth in chocolate 3D printing

Industry giants such as Chock Fill A have a big lead over new entrants with an entire line of chocolate 3D printers for home and industrial use. Other start ups such as Colorado based Hanky, makers of the iconic red and white striped 3D Chocolate Printing pen, are also forging ahead. Professor Yank knew there was an opportunity out there to create a revolutionary new chocolate 3D printing technology that was completely new and revolutionary. Hanky & Chock Fill A still relied on old 3D printing technology from ancient 3D printers that have been used since they were developed during early nineties for the Meiji Restoration of Tokyu Hands, the largest department store in Japan. Not many know that Japanese inventor Professor Kuso Kurae originally invented 3D printing in order to make exquisite wall decorations for the iconic Tokio department store. From such comparatively humble beginnings this world changing technology has now blossomed. Yank knew, that invention was the path forward and only by creating a true chocolate 3D printing revolution and developing better technology they would succeed.

Other chocolate 3D printers use stepper motors to power their axes. These stepper motors spin counterclockwise in a brownian motion propelling solid magnets in a vacuum. Standard on almost all 3D printers the team had tried to adapt them for use in their full color chocolate 3D printing technology. Without the needed U and V axes control however their results were disappointing. Rather than 3D printing Yoda dolls or other useful 3D printed objects, everything melted immediately.

An Eggbot 3D printing an Egg in Full color

An Eggbotsz 3D printing an Egg in Full color, note the U axis with its distinctive yellow tip.

Without adequate U & V control the team would never achieve high dimensional flavor-ability and their ground breaking project was doomed. A further issue was with the heated bed. 3D printers deposit their material on a heated build platform, also called a bed in the industry. Due to the choco solid degradation and bad U & V control, the team had what is called in the industry an “unmade bed”, disastrous out of the box print results. Because chocolate has to be tempered in order to print properly temperature control of the bed was another crucial element. The team had been using sine heat systems to temper the chocolate but the results were atrocious lacking any dimensional technobility and superforce. With funding running out the team shared many sleepless nights. Professor Yank begged the iron willed university administration for more funding but it seemed that the project would be cancelled. Kono Yarou’s studious discovery saved the day. Kono Yarou is a studious and dedicated Social Engineer who reads journals such as 4D Printing & Free Form Fabrication in Gastronomy recreatively. The 23 year old Japanese student has large round eyes and a rather surprised expression on his face as well as a shock of blonde hair. In his spare time he’s often seen wandering the tree lined Italianate CMU campus with a journal in hand. During one of these walks, in an obscure engineering journal, he happened to come across a paper by a Dutch team from Zwaffelen University.

A diagram explaining Eggbot’s revolutionary 3D printing technology, Zwaffelen University’s Macrocontroller is shown in yellow to the right The heated bed is shown in light green. The U axis is grey and the V axis is dark green.

The team had developed a method for making a macrocontroller for cosign heating. With limited applications the technology had not attracted attention. Yarou noticed however that the Dutch team’s controller worked at temperatures of 100 and 130 Kelvin, perfect for tempering chocolate.  Armed with this information the received two NSF grants as well as $1.8 million in funding from America Makes. This let them commercialize Zwaffelen University’s macrocontroller and for the first time adequately temper chocolate inside a 3D printer. Another breakthrough occurred when Wǒ Kào, a 23 year old Dianetics major from Shén Jīng Bìng, China disassembled a stepper motor in order to reverse engineer it. She found that by reversing the polarity of the magnets inside the motor and applying Van der Waals forces to the resulting magnet she could achieve the superior U & V control needed for full color chocolate 3D Printing. The team then went on to develop their Continuous Line Inference Traversing 3D printing technology. After perfecting their invention they partnered with Eggbotsz to bring it to market.

The Eggbot

The Eggbotsz putting the finishing touches on one of Ms. Jil Ipoya’s award winning culinary delights.

The Future of Everything

Eggbotsz co-founder Henry Gondorff explains that whilst 3D printed eggs are poised to take over the culinary world but that, “people all want to full color 3D print chocolate.” “We could already 3D print duck eggs, century eggs and chicken eggs, but so far full color was beyond humanity’s grasp.” “We were amazed at the capabilities of the CMU team’s technology and we think that full color chocolate 3D printing of eggs is a culinary revolution set to revolutionize the 3D Printing revolution. This revolution in a revolution will revolutionize everything bringing with it revolutionary applications for this game changing technology that will empower revolutionaries in their own revolutions. Full color 3D chocolate egg printing is set to make a bigger impact on the world than any other technology ever has.”

Eggbot Co-Founder Henry Gondorff

Eggbot Co-Founder Henry Gondorff wants to revolutionize how eggs are made

The new Eggbotsz ChocoRockoBotto is capable of 3D printing 24 million colors in true full color at a 1080p HD resolution. The bidirectional multi-piezo print head of the Eggbotsz moves at a speed of 240 FPS at 640 Choxels. At this level of Choxels the chocolate doesn’t coat the individual taste buds like regular non-3D printed chocolate does but rather blanket the tastebuds in a Moroni Defined Matrix. This non euclidian structure allows for more depth of flavor. The Eggbotsz also has a dimensional accuracy of 4 and a XY positioning accuracy of 2m. The Interior Wall Volume height of the 3D printer is 11 MHz and the layer thickness of the printer is .000005 micron. The 3D printer has a build volume of 50 by 50 by 50 cm, which is perfect for even very large eggs or batches of dozens of eggs at a time. We think that this 3D printer is an amazing piece of work and can’t wait to see it come to kitchens everywhere! Competition is already springing up worldwide however with Dutch Designer Karijn Wessing designing an open source eggbot which is almost entirely 3D printable. It is truly an exciting time to be alive!

Karijn Wessin's open source 3D printable eggbot

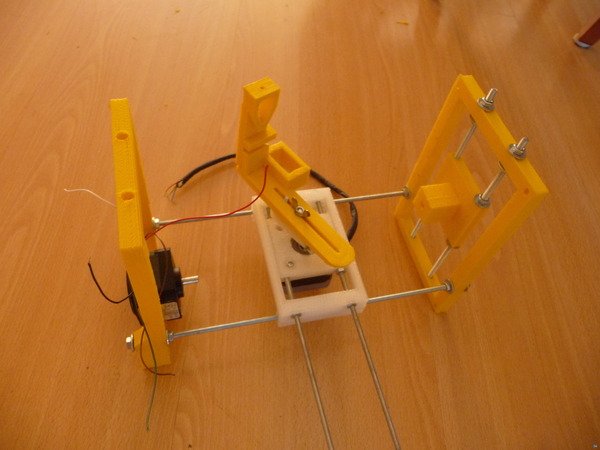
Karijn Wessing’s open source 3D printable eggbot


 Creative Commons Attribution, Creative Commons AttributionCreative Commons AttributionCreative Commons Attribution.


New release at YouMagine

Our developers Wilco & Martijn continue to improve YouMagine according to your feedback. They’ve made some small bugfixes and design tweaks. Please do keep your feedback and suggestions coming. Additionally YouMagine has been improved so that:

  • When you hover and hold your mouse cursor over a design, more images will appear.
  • The counting of Favorites has now been improved, it will now show how many times a design has been favorited.
  • You can now change and delete an “I printed this design” image.
  • The RSS feed now includes Images (thank you Lawrence for the suggestion!)
  • The site search has been improved.
  • Increased the stability and performance of YouMagine.
  • The site now loads faster and feels more responsive.
  • The images are now “vanity loaded”: the page is loaded first and then visible images are loaded. After that other images are preloaded.
  • We now have breadcrumbs on the top of the page so you can easily navigate through the site.
    Pic Unrelated

    Pic Unrelated

    Creative Commons Attribution by Ben Sale, image of a Rosy Footman (Miltochrista miniata) moth.

Interview with Ryan Adams of the MaplePrintMini 3D printer

We love it when our community shares 3D printer upgrades, improvements or entire 3D printers on YouMagine. Ryan Adams did just that, he made his MaplePrintMini 3D printer and shared it with the world. We were curious about his machine and asked him how he made it. We were especially intrigued since apart from the electronics, screws and motors the MaplePrintMini is entirely 3D printed.

Ryan Adams leaning forward next to his MaplePrintMini 3D printer

Ryan Adams and his MaplePrintMini 3D printer

Why did you make this printer?

My original reasoning for this printer was to prove that I could design and build a printer myself. All of the printers I had owned up to that point (A Printrbot and MakerFarm Prusa i3) were built from kits, and I wanted to prove that I could design and produce a similar printer to theirs. I was also captivated by the idea of the RepRap project, and wanted to see how far I could take the project’s philosophy in designing this printer, with the end result being one which is, excluding mechanical components, almost entirely 3D printed.

How did you do it?

When I set out to design this printer, I had two main goals, the first that I be able to print as much of the printer as possible, and the second be that the overall foot print of the printer be less than that of a legal-sized sheet of paper. Strange, I know, but I wanted to keep the printer’s foot print small and portable. The design process was fairly straight forward, I set up my size boundaries, and designed the printer within those boundaries. I used AutoCAD for most of this process, and relied heavily on my own calipers, and rulers to measure mechanical components that I’d then model in CAD, and build the printer around. It had been several years since I last designed or modeled anything with this sort of scale, so it was very much a learning process for me, trying to remember how to model and design parts correctly. The preliminary design took place over the winter holidays, and took about 30 hours from conception to printable designs.

Did you design the whole thing in one go and then build it? Or was it more an iterative process of improving parts?

Throughout the initial design process, there was multiple times that I would spot an issue, or think of a better way of designing a part. The extruder carrier, and X-axis have probably gone through 4 or 5 revisions before I even thought about printing. The revisions were far more minor once parts were printed though. I tried my best to catch as many errors and flaws as I could while still in the design stage, so that I could minimize my printed waste and build the printer quicker. With the exception of 4 or 5 parts, every piece was printed the way it was designed initially. I was honestly surprised that when the build process begun, that parts fit as well as they did, and that most everything just seemed to work correctly. As the build progressed, I revised a few parts to aid in the assembly process, or in the case of the extruder, to add additional cooling, but for the most part, it was a straight forward build with very few issues.

What’s so special about it?

I think what sets the printer apart is its printable design. No component on this printer is larger than 195mm x 195mm, which allows anyone with a average sized 3D printer to print all the parts for this project on their own. I also feel it embodies the RepRap philosophy better than some other machines with which to the extent of how much of the design is printable. I admire printers such as the Prusa i3, MendelMax and others, but seeing their wooden and metal rod construction takes away from the concepts of a true RepRap, so I feel this printer is proof that it is possible to build a strong, accurate printer using almost entirely 3D printed parts.

What would I need besides the design files on YouMagine to build one?

Aside from the design files on YouMagine, you will need a 3D printer or someone with a 3D printer to print the parts. Expect the parts to take 60 or so hours to print, it’s a long job, but worth it when it’s done. Once you have printed all the required parts, you will need the ‘standard’ mechanical components which consists of the usual NEMA 17 steppers (in this case, 36 oz smaller units are used), 8mm linear rod and LM8SUU linear bearings. You will also need about a meters worth of GT2 belt, and 16 or 20 tooth pulleys, 4mm threaded rod and couplings for the Z axis as well and you will also need 3 micro switches for the end stops. Extruder wise, I used a Printrbot Aluminum extruder, and a Ubis hot end, though you could mount your own direct drive extruder and hot end of your choice. Electronics wise, your choice of controller, RAMPS or a printrboard should fit in the enclosure. Lastly, you will need screws, a lot of them. There are about 150 M3x10 socket cap screws used, and about 30 M5x20 socket cap screws as well.

A purple 3D printed shark form Shark test piece made on a MaplePrint Mini.

Shark test piece made on a MaplePrint Mini.

What kind of print results do you have?

Print results have been fairly decent given the relative state of calibration that it has received. I was very pleased that upon printing my first calibration cube, that the dimensions were accurate in both the X and Y axis, and that the details and layer heights seemed well defined. Subsequent prints such as Mr. Jaws have pretty well defined detail in the teeth and corners, and came out better than I was expecting. I’m still tuning the printer, and calibrating the e-steps and extrusion, so there are still improvements to be made, but overall, the printer prints better than some of my first prints on other machines.

What software did you use to design it?

All of the design was done in AutoCAD 2015. I prefer the work flow and familiarity of AutoCAD over that of Inventor or Solidworks. All of the mechanical components were modeled in AutoCAD as well. Before printing, I ‘plated’ the entire model, that is, disassembling my design into ‘plates’ of correctly orientated parts that could be exported to STL’s and printed. This saved a lot of time later on and removed the need to have to manipulate or optimize the part in my slicer.

What firmware does it run?

The printer uses a stock RAMPS 1.4 controller running ErikZalm’s MarlinFirmware. I selected Marlin over others for its configurability and simply configuration. Total time from downloading, modifying, flashing, to printing, was about half an hour.

What was the most difficult part of making the printer?

Probably the most challenging part of the entire process was printing the frame. Each frame panel required 5 hours of print time, which given my daily schedule made it difficult to fit these prints in. It meant that these pieces were printed on weekends and days off, which in turn delayed the entire process. Aside from that though, the process was fairly straight forward, if I had any other complaints about the process, it would be the almost-insane amount of screws required in the build. I wanted to ensure the printer was structurally sound and rigid, so I designed it with many mounting points, but it was only when I started building the printer did I realize juts how many I had used!

MaplePrint Mini 3D printer printing.

MaplePrint Mini 3D printer printing.

Where do you hope to go from here?

Well I’m on to bigger and better things already! Shortly after finishing this printer, I embarked on the design of its successor. While I’m pleased with how this printer came out, I recognize that there is still a lot of room for improvement and optimization. Now that we know it’s possible to build a printer from almost entirely printed parts, I’m again using this approach for version two. I’m finalizing the design now, and hope to be printing parts for it in the next week. I will again be publishing my progress and design, and releasing the designs for the printer on YouMagine shortly, but I can promise that it will have a much larger build volume, and equally small foot print, improved rigidity, and far fewer parts to print and assemble. Aside from that, I hope I can continue to design and release printers, components and upgrades that further the RepRap project, excite current 3D printer users, and introduce new users and designers to the amazing industry of 3D printing!

Out-of-the-box upgrades: Z-Unlimited

Projects and 3D printing companies like Ultimaker and Printrbot who share their design files online (1, 2) allow anyone, without having to ask, to think of improvements and actually implement them. Whether it’s a little tweak or something that turns the whole printing experience upside-down is up to you.

Joris van Tubergen is someone who does exactly that, on a regular basis.

Printing bigger, faster, in a different way and with sweet new materials or new appearances has always been Joris’ trademark. He started experimenting with an existing Ultimaker allowing it to print huge objects, like this elephant:

3D-printed-elephant-Joris-van-Tubergen

Z-Unlimited – now on Kickstarter – allows you to print much bigger things than the 3D printer that makes it. How? Joris van Tubergen an out-of-the box thinker with a mentality that an Ultimaker is a device that can be changed to do exactly what you want it to do. He put the Ultimaker upside down, pointed the printhead outward again and let it lift itself up while printing.

You might ask, who is Joris, how does it work and how can I start printing like this? We will have to make it happen together, because Joris needs your support! You can back it through Kickstarter and get your own Z-Unlimited:

Print tall with Joris' Z-Unlimited!

Print tall with Joris’ Z-Unlimited!

Want to know more about Joris? Did you know that he…

  • makes regular appearances on Dutch TV?
  • played a pivotal role in creating the Kamermaker with DUS Architects and Ultimaker,
  • prints challenging prints more easily because he’s not afraid to hack some GCode parsing scripts together with programming Blender, even though he’s not a programmer by education?
  • the 3D printed elephant actually had tiny names inscribed into the surface, part of the huge 3D model?
  • works for the legendary FabLab “Protospace” in Utrecht, as the first Lab manager on site. Joris helped make the first RepRap and Ultimaker workshops possible, even before Ultimaker existed.
  • made the Fairphone + 3DHubs Phone covers possible?
  • has published most of his 3D creations on YouMagine? Check out his profile here.
  • applied Augmented Reality with QR codes to his 3D printing (yes, lots of buzz words!)
  • embedded the source code of a 3D object into an RFID chip, physically embedded into the printed object. Source code inside!
  • And even more about Joris here

It’s not secret: We’re big fans of Joris and all other makers that are redefining what 3D printing is! We’d love to see what he comes up with next!

3DPL released: an Open Source License for 3D Printed things

Sketch by Olivier van Herpt

Sketch by Olivier van Herpt

At YouMagine we’ve spent the last months creating the 3DPL for the 3D printing community. The 3DPL is a license for 3D Printed things that has been specially made so that people can create, improve and share their inventions with the world. Most of all we want to let us all stand on the shoulders of giants. We want people to build upon previous technologies, improve them, remix them and individualize them. We wish to create the preconditions for a 3D printed world where all the stuff in the world is iteratively and fluidly collectively improved. The 3DPL is a part of our effort to make all the things in the world malleable.

We’re doing this for you and so would like your help. Please give us feedback. Tell us what doesn’t make sense to you, what you hate, what we should change. Please involve others. We’re especially interested in home 3D printer users, companies that use 3D printing, lawyers, people from the wider open source community, inventors, artists, designers, makers and creators in the broadest sense. The 3DPL itself can be found here on Medium and you can comment on it there. Feel free also to ask questions or discuss it in the comments below this post. We consider the license to be in beta, so anything and everything is open for discussion and change. We would like to make it as inclusive as possible in order to cater to the entire 3D printing community so please get stuck in there and tell us what we need to improve.

Why should you get involved in shaping the 3DPL?

  • We have a real opportunity here to lay the foundations for a world where much of the emerging technology landscape will be available to all under an open source license. A world where a good portion of the inventions made in the future will be shared and created through 3D printing.
  • Other open source licenses were not created with 3D printing in mind.
  • In order to safeguard and encourage creation we have to properly protect inventors and innovators or progress and breakthroughs will be impeded.
  • In order to ensure progress on collectively developed technologies disputes over intellectual property should be resolved in a quick and efficient manner.
  • In order to encourage sharing and remix it should be clear what rights are held by whom and what one can do with a file that has been shared.
  • Since the 3DPL is the first and only license for 3D printed things it may just end up being the standard one everyone uses. And it would suck if the 3DPL sucked.
Sketch by Olivier van Herpt

Sketch by Olivier van Herpt

What are some interesting things about the 3DPL?

  • The design must always be attributed.
  • All subsequent derivatives of a shared file must be available for remix and sharing.
  • If the creator requires that you include reference to be printed on or in the physical printed object, such as a logo or name, you have to respect that and are not allowed to remove that reference without the creator’s approval.
  • If one doesn’t abide by the terms of the license the rights granted under the 3DPL will be terminated immediately.
  • If you fail to comply with the license such as selling a work that was meant to be non-commercial then you must pay the creator 3 times the gross revenue you made on the sale.
  • Arbitration for conflicts between parties is arranged for in accordance with the WIPO Expert Determination Rules.

We have 3 license types:

REMIX: With a REMIX license your derivative work must be available to remix and share by others.

REMIX — NON COM A REMIX — NON COM license restricts the use of the Design File, the modified Design File and any Designed Product to non-commercial use only. The Design File, the Modified Design File or any Designed Product may not be used with the intent of making money directly or indirectly from it.

REMIX — RIGHTS MELT REMIX — NON COM for 12 months melting down to REMIX after 12 months. With a REMIX — RIGHTS MELT license your design file is available as a non-commercial share-alike file for 12 months. After this period the license will automatically become REMIX.

Process

Sketches by Olivier van Herpt

JJRobots cool open source robots on YouMagine

Open Source Air Hockey Robot

Open Source Air Hockey Robot by JJRobots

One very inspiring YouMagine community member is JJRobots. They make super fun robots such as an open source air hockey robot and an open source self balancing robot. This is just the kind of innovation we’d love to support here at YouMagine so I interviewed the team to find out what they’re up to.

Open Source Balancing Robot by JJRobots

Open Source Balancing Robot by JJRobots

What is JJRobots?
We are two electronic hobbyist who really wanted to share the ideas and knowledge with everyone who loves DIY robotics. JJrobots want to… fill the gap that exists in the DIY world, in which you need to have an electronics/ computing background in order to start a project. JJrobots is oriented to the MEDIUM skill level “maker”, we want to provide them with useful, affordable and flexible electronics that you can use for a lot of different projects. B-robot and the Air hockey robot are just two of a big list of projects we are developing right now. The following project will use the same electronics we are currently selling now in our shop.

Why did you start it?
The idea of JJROBOTS born nine months ago when I, Juan Pedro, working and living in UK, told Jose (my partner here) to open a web page to host the projects that Jose had been publishing in other blog and make it easier to people to make them by themselves (and create a platform to grow with new projects).

JJROBOTS is a blog with information about the projects, documentation, build manuals, schemes, a “how it works” section, and an online SHOP for the hardware parts (electronics, plastic parts…). Our goal is that people have fun making their own robots and, at the same time, learn how it all works. ALL will be OPEN, shared and documented. There will be a growing community behind with forums so you could get help from us and from other users.

We want that people take our projects as a base, and feel free to hack/modify them to the limits!

B-ROBOT is a good example. Starting from the design Jose published last year, we have been improving it in many ways. We have created a new electronics shield for an Arduino Leonardo, instructions, building manual and schemes. The code is now much simpler and better documented. This project is very FUN and ,as you can see in the video, the control is WIFI excellent too! (Kids love the robot)

This is an unique gadget that you could make by yourself (DIY). This is not a toy, it is a robot that uses good motors, quality electronics, and sophisticated control algorithms.
Our idea is also to reuse most of the components involved in the early projects in another future projects. For example, the Wifi module (which is not cheap) will be used soon in more projects (subscribe to jjrobots to keep you updated). You are investing in electronic components that could have several lives (motors, Arduino, wifi…)

Over the years we have realized that people love the open projects that we have been publishing here (B-ROBOT, arduspider, Air hockey robot…) but people have problems to reproduce them. Now there are no excuses! Everyone will have available all the parts and documentation to let them be successful!

Why do you share your designs on YouMagine?
I wanted to use YouMagine since I bought an Ultimaker 6 months ago and I knew about the existence of this website. I do love my 3D printer (now printing with FLEX PLA which has skyrocketed my “maker” capabilities!). This is a very good platform to spread the project.

How does your balancing robot work?
There is information here. But as a short brief:
“B-ROBOT is a remotely controlled self-balancing Arduino robot created with 3D printed parts. With only two wheels,B-ROBOT is able to maintain his balance all the time by using his internal sensors and by driving the motors. You can control your Robot, making him move or spin, by sending command through a Smartphone, Tablet or PC while he keeps the balance.

B-ROBOT reads his inertial sensors (accelerometers and gyroscopes integrated on the MPU6000 chip) 200 times per second. He calculates his attitude (angle with respect to the horizon) and compares this angle with the target angle (0º if he wants to maintain balance without moving, or a positive or negative angle if he wants to move forward or backwards). Using the difference between the target angle (let’s say 0º) and actual angle (let’s say 3º) he drives a Control System to send the right commands to the motors to maintain his balance. The commands to the motors are accelerations. For example if the robot is tilted forward (angle of robot is 3º) then he sends a command to the motors to accelerate forward until this angle is reduced to zero to preserve the balance.”

Why make an air hockey robot?
Everything started when Jose (my partner and friend) built his 3D printer. First, the possibility to design and build our own parts and second, how could we hack the components of a 3D printer to make something different?

Jose´s daughter loves the Air Hockey game and we love robotics so one day an idea was born in our mind… can we construct…??… Mmmmm …. it seemed very complicated and with many unresolved questions (puck detection??, robot speed??), but that is also part of the fun…

What do you hope to achieve with JJRobots? Why do you think its important to teach kids about robotics?
Well, we are loosing the contact with what lies beneath technology. You can buy an Iphone and play with its tactile screen but not know anything about how this device really works.
How does an industrial machine detect broken cookies during the packaging process?

Hacking can be performed only when you really know how a thing works. We want to “hack” ordinary stuff and create cool things showing how it is done. We want to let kids (and adults!)  to do it by themselves and by asking for a helping hand in our webpage´s forum.

How large is the company?
Just Jose and I (Juan Pedro). Each one have our own jobs beside jjrobots, so right now, these ideas can not feed us, we will need to find time for this exciting project.

This is a really great initiative and you can check out their shop here or download the parts from YouMagine here..